Instead of starting with local infrastructure, channel daemons, and agent workspaces, Brainybear focuses on deployable assistants. You can create an assistant, connect channels like Telegram and email, test the conversation flow, and then extend it with reminders, recurring tasks, and real actions.
In this guide, we will walk through how to build a Telegram and email AI agent with Brainybear step by step.
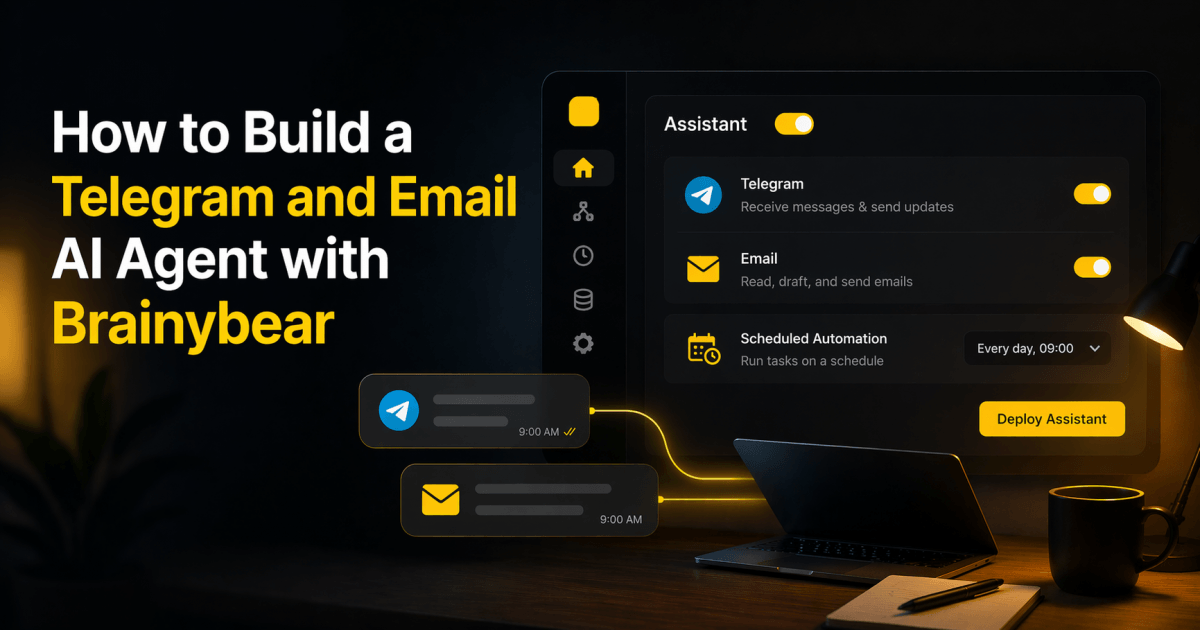
What You Are Building
By the end of this tutorial, you should have:
- a Brainybear assistant created
- Telegram connected to that assistant
- email connected to that assistant
- a working Telegram-based AI agent
- a basic email-aware assistant
- the option to add task-driven follow-up later
This is the practical path if your goal is speed and usability rather than deep self-hosted customization.
What You Need Before You Start
Before you begin, prepare:
- a Brainybear account
- a Telegram bot token
- an email account you want the assistant to connect to
- login access to the Brainybear dashboard
Unlike a self-hosted setup, you do not need to provision a local gateway first.
Step 1: Create a New Assistant
In Brainybear, create a new assistant.
At this stage, decide what kind of assistant you want:
- Public assistant for customer-facing or external conversations
- Personal assistant for reminders, recurring tasks, memory, and assistant-style workflows
If your goal is a Telegram and email personal AI agent, choose Personal assistant.
Step 2: Set the Assistant Name and Core Prompt
Give the assistant a clear name and instruction.
For example:
- name:
Telegram Email Assistant - instruction:
You are a helpful personal AI assistant. You help summarize emails, answer questions, and send reminders through connected channels.
Keep the first version simple. You can refine the prompt later after the channels are working.
Step 3: Connect Telegram
Go to the assistant’s integrations or channel setup and connect Telegram.
The practical Telegram setup flow is:
- create a bot via
@BotFather - copy the bot token
- paste the token into the Brainybear Telegram integration
- save the integration
- send a test message to the bot from your Telegram account
Once connected, your assistant should be able to receive Telegram messages and reply inside the same conversation.
Step 4: Test the Telegram Assistant
Send a few simple messages to confirm the assistant is live:
HiWhat can you help me with?Summarize what kind of assistant you areRemember that I prefer concise replies
At this stage, you are verifying:
- Telegram connection works
- inbound and outbound chat works
- the assistant instruction is being applied
- the thread context is stable
Step 5: Connect Email
Next, connect the email account you want the assistant to use.
Depending on the provider, this usually means:
- email address
- IMAP host and port
- SMTP host and port
- username
- password or app password
For example, with Gmail this typically means:
- IMAP host:
imap.gmail.com - IMAP port:
993 - SMTP host:
smtp.gmail.com - SMTP port:
587
Once saved, the assistant can use email tools to read recent email, send email, and reply when supported by the runtime.
Step 6: Confirm Email Access
Once email is connected, test it directly in chat.
Good test prompts:
Do you have access to read my email?Read my recent emailsSummarize the latest 5 emailsDraft an email to me about today’s priorities
This confirms whether the email connection is saved correctly, the runtime tools are enabled for this assistant, and the assistant can actually use the inbox in practice.
Step 7: Combine Telegram and Email in One Agent
Now that both channels are connected, you have the foundation for a Telegram and email AI agent.
This means the assistant can:
- live in Telegram as the conversational interface
- read or act on email through connected email tools
- use Telegram as the notification or reply channel
- later create recurring checks and automations if needed
Step 8: Add a Simple Real Workflow
A good first practical workflow is:
- read recent email
- summarize important items
- answer inside Telegram
For example, ask:
Check my recent emails and tell me if anything important needs a replyLook for any invoice emails and summarize themRead my inbox and tell me if there are any urgent action items
Step 9: Turn It into an Automation
Once the core agent works, Brainybear can go a step further.
A personal assistant can create tasks directly from chat, such as:
Check my email every 5 minutes and alert me on Telegram if a new invoice arrivesRemind me every day at 11:30 AM Singapore time to renew the serverSend me a Telegram reminder when an email contains the word urgent
Instead of limiting the assistant to conversation only, Brainybear lets the assistant create and execute recurring task-based workflows.
Step 10: Test End-to-End
Before you treat the assistant as production-ready, test the full path:
- message the assistant from Telegram
- ask it to read recent email
- confirm the response is correct
- create a simple task or reminder
- verify the reminder or notification is delivered correctly
Troubleshooting Checklist
If Telegram is not working:
- confirm the bot token is valid
- send a fresh message to the bot
- make sure the assistant is connected to the correct Telegram integration
If email is not working:
- confirm IMAP and SMTP settings
- verify the assistant type is
personalif you want task behavior - make sure the email tools are enabled in the runtime
- test direct email-read prompts in a fresh chat thread
If tasks are not working:
- confirm the assistant is
personal - confirm the needed action channel is connected
- confirm recurring task instructions include a valid recipient when required
How Long Does Setup Take?
For most users, the first working version can be much faster than a self-hosted agent path.
A realistic setup can look like this:
- create assistant: 2 to 4 minutes
- connect Telegram: 3 to 5 minutes
- connect email: 5 to 8 minutes
- test both: 3 to 5 minutes
A practical Telegram and email AI agent can often be working in around 15 to 25 minutes, and sometimes faster if your credentials are already ready.
Final Thoughts
Brainybear is the better fit if your goal is not just to build an AI assistant, but to get one working quickly across real channels.
The product is especially strong when you want:
- Telegram as the live conversation channel
- email as a connected data and action channel
- reminders and recurring workflows later
- one platform for both personal and public assistants
If your priority is fast deployment, usable automation, and lower setup overhead, Brainybear gives you a cleaner path than a more infrastructure-heavy self-hosted agent stack.
Related Reading
- How to Build a Telegram and Email AI Agent with OpenClaw
- Which Is Faster for Building a Telegram and Email AI Agent OpenClaw or Brainybear